When your Whirlpool refrigerator stops making ice, especially during a scorching Austin summer, it can feel like a major appliance crisis. But don’t sweat it. More often than not, the problem is surprisingly simple: the ice maker is switched off, the freezer temperature is too high, or you have a clogged water line. It’s tempting to assume the worst, but before you schedule a costly repair, a few basic checks can often solve the issue.
If you’ve tried the simple fixes and are still stuck, or just want an expert’s guidance without the high service fee, HomeWise Services has a white-glove solution for Austin homeowners. For a flat $20 fee, our unique concierge service connects you directly with a master technician. They’ll help you troubleshoot the problem over the phone, recommend the right parts, and even schedule a professional repair if needed.
Your Quick Guide to a Working Ice Maker
An ice maker quitting on you is a real pain, especially when an ice-cold drink is non-negotiable. The good news is that for many homeowners in Austin, the fix is frequently something you can handle yourself in just a few minutes.
If you’d rather skip the guesswork, our HomeWise Services concierge service is here to help. For just $20, connect with a master technician in Austin to diagnose your issue, recommend parts, and schedule a white-glove repair.
Before you make that call, though, let’s start with a quick troubleshooting checklist. This table covers the most common—and easiest to fix—issues we see when providing appliance repair in Austin.
Initial Troubleshooting Checklist for Whirlpool Ice Makers
Here’s a quick reference guide to help you identify the most common and easily fixable ice maker issues we encounter with our Austin clients.
| Symptom | Potential Cause | DIY Action |
|---|---|---|
| No ice at all | Ice maker is turned off | Locate the control arm or on/off switch and ensure it’s in the “On” position. |
| No ice, no sound | Water supply is off | Check the water valve behind the fridge; make sure it’s fully open. |
| Small or misshapen cubes | Low water pressure or clogged filter | Inspect the water line for kinks and replace the water filter if it’s old. |
| Ice maker won’t cycle | Freezer is too warm | Use a thermometer to verify the freezer is at 0°F (-18°C). Adjust if needed. |
Running through these simple checks can save you a lot of time and frustration. If your problem persists after trying these steps, you might be dealing with a more complex issue.
Check The Obvious First
Let’s dig into the most common culprits that account for a surprising number of service calls. These are simple enough for any homeowner to check.
- Is the Ice Maker On? It sounds basic, but you’d be surprised. Every Whirlpool ice maker has either a metal control arm or an on/off switch. If that wire arm is locked in the raised position, it’s off. Simply lower it to turn the unit back on.
- Is the Water Supply Connected? Take a look behind your refrigerator and find the water valve. It needs to be fully open. It’s not uncommon for these to get bumped or nudged partially closed during cleaning, which cuts off the water flow.
This image shows you exactly what to look for when checking the water supply valve. Getting this right is a critical first step.
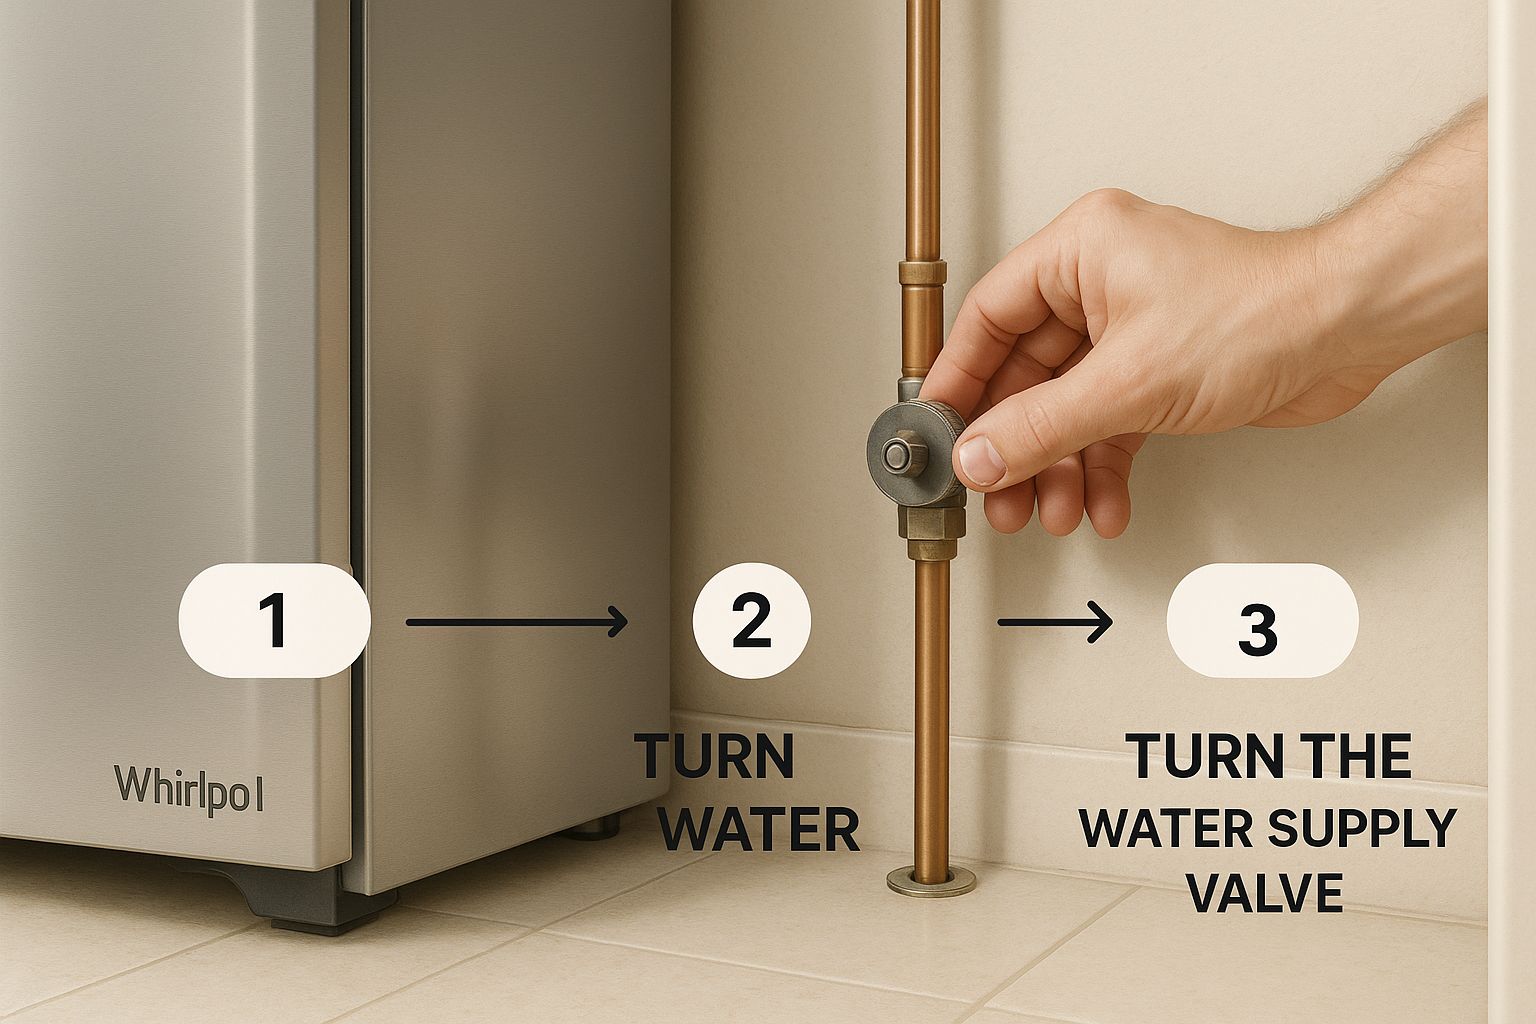
Confirming the valve is completely open ensures that water can even get to the ice maker, eliminating a very common point of failure right off the bat.
Verify the Freezer Temperature
Here’s one of the most overlooked causes of a dead ice maker: an incorrect freezer temperature.
If your freezer isn’t cold enough, the ice maker’s internal thermostat simply won’t get the signal to start a new harvest cycle. Based on Whirlpool’s official guidance, your freezer must be set to 0°F (-18°C) for the ice maker to work right. Even a few degrees warmer can shut down ice production completely.
Diagnosing Your Water Supply System
If the simple checks didn’t get your ice maker running again, it’s time to dig a little deeper into the water supply system. Think of it like a plumbing investigation. Your Whirlpool fridge can’t make ice if it’s not getting a steady flow of water, and there are a few common choke points that can stop it cold.
Before we start, it’s a good idea to pull your fridge out, unplug it, and find the main water supply valve to turn it off. A little caution now prevents a big mess later. Safety first is always the right call when you’re mixing water and electricity.
Inspect the Water Line and Valve
Let’s start with the most obvious connection: the water line snaking out from the back of your fridge. Gently pull the refrigerator away from the wall and take a good look at that thin copper or plastic tube. You’re searching for any sharp bends, kinks, or crimps that could be pinching off the water flow. It happens more often than you’d think.
Next, find the saddle valve—that little metal clamp on your home’s main water pipe that feeds your fridge. Make sure the handle is turned all the way counter-clockwise, which is the “open” position. These valves are notorious for failing or getting bumped into a partially closed position, and they’re a frequent cause of a Whirlpool refrigerator not making ice.
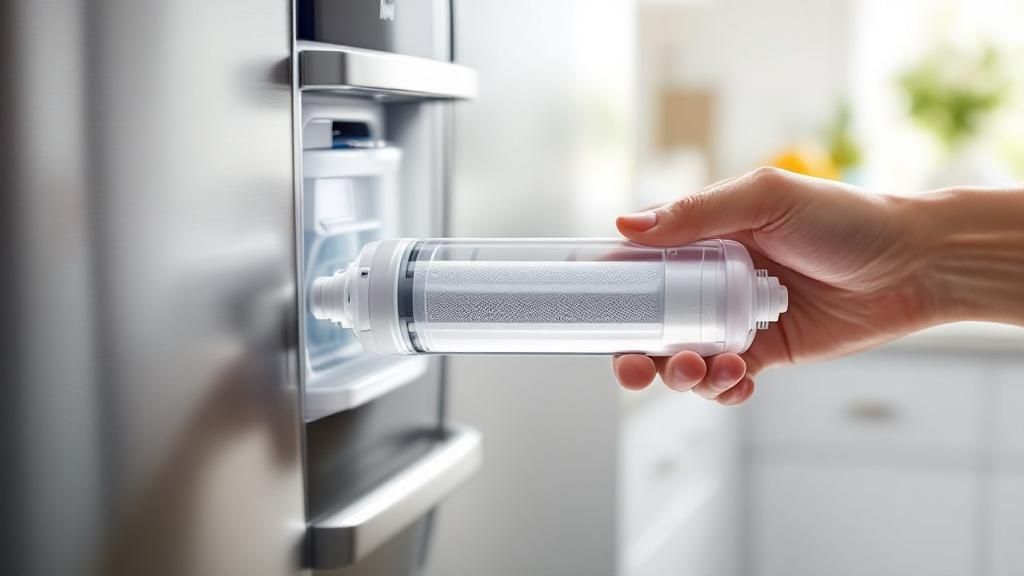
Examine the Water Filter
A clogged water filter is hands-down one of the most common culprits, especially if you live in Austin with our hard water. Over months of use, that filter gets packed with minerals and contaminants until it restricts water flow to a mere trickle, effectively starving the ice maker.
Expert Tip: Most manufacturers, including Whirlpool, recommend swapping out your water filter every six months. If you can’t remember the last time you changed it, or if your water dispenser is slow, a new filter is a great place to start.
Replacing the filter is usually a straightforward, tool-free job. You can easily find the right one for your model at reliable suppliers like RepairClinic or Sears PartsDirect.
Check for a Frozen Water Line
Sometimes the blockage is right at the finish line. The small tube that carries water from the inlet valve into the freezer to fill the ice mold can actually freeze solid. This is common if your freezer temperature is set a bit too low or if there’s a small, intermittent leak from the water inlet valve.
You can usually spot this by looking at the small tube where it enters the back of the ice maker assembly. If you see frost or a solid chunk of ice, you’ve found your problem. A hairdryer on a low setting is perfect for gently thawing it out. Just be careful not to hold it too close and melt any of the surrounding plastic parts.
If you’ve gone through these checks and are still stumped, it’s better not to guess. For a flat $20 fee, our HomeWise Services concierge service can connect you with a master technician in Austin for a remote diagnosis. For instant answers, you can also try JustAnswer for fast, reliable help from certified appliance experts anytime.
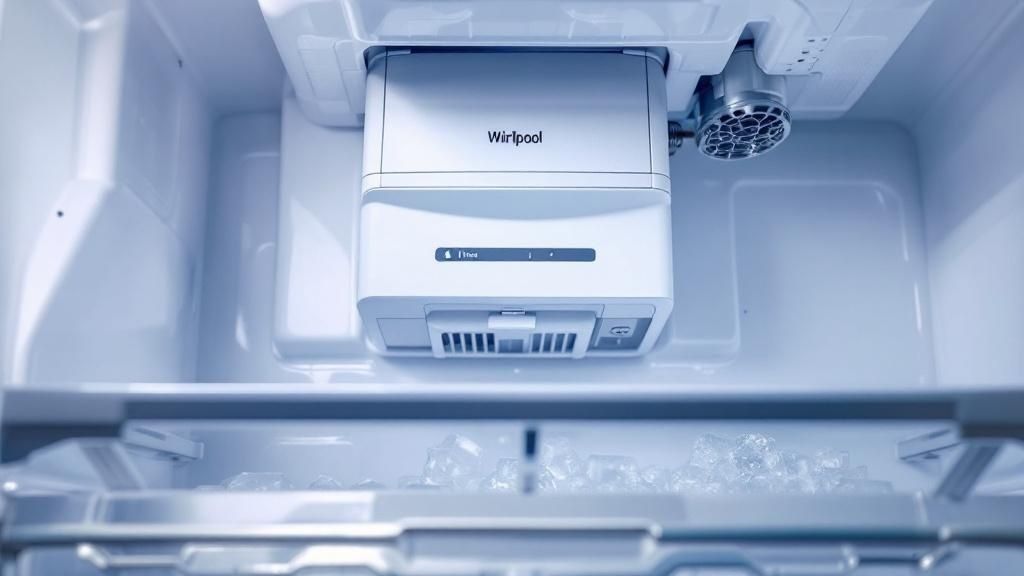
If you’ve confirmed water is getting to the ice maker, the next stop on our diagnostic tour is the ice maker assembly itself. This is where the magic is supposed to happen. When it doesn’t, a mechanical failure inside the unit is often the culprit, and a good visual check can tell you a lot.
Think of the ice maker as a tiny, self-contained factory. All its components have to work in perfect sync, and when one gear grinds to a halt or one part breaks, the entire production line shuts down.
Check the Control Arm First
One of the most common—and thankfully, easiest—things to check is the control arm, sometimes called a “feeler” arm. This simple wire or plastic lever has one job: to tell the ice maker when the ice bin is full. As ice piles up, it pushes the arm up, which signals the unit to stop making more.
Look inside your freezer at the ice bin.
- Is the arm stuck in the “up” position? It’s incredibly common for an ice cube to get wedged underneath, holding the arm up and fooling the ice maker into thinking the bin is full. Just gently knock the cube out of the way.
- Is the arm disconnected or broken? If it feels floppy or looks damaged, it can’t drop down properly to signal that it’s time to start a new batch of ice.
A stuck control arm is a classic reason for an ice maker to suddenly stop working. The good news is that it’s often a fix that takes about five seconds and requires zero tools.
Manually Test the Harvest Cycle
If the control arm looks good, the next step is to test the motor and gears. We can do this by forcing a manual harvest cycle. This quick test tells you if the mechanical parts—the motor, gears, and ejector arms—are physically capable of pushing out ice and calling for more water.
The exact method to trigger this cycle can differ between Whirlpool models, so you may need to check your owner’s manual for specifics, but it often involves a small reset button or a switch.
Expert Insight: Running a manual cycle is a huge diagnostic shortcut. If the rake sweeps through the mold (as if it’s pushing out imaginary ice cubes) and then you hear the water valve click open to refill the tray, you can be pretty confident the motor, gears, and water inlet valve are all working. If you push the button and get nothing but silence, you’ve narrowed the problem down to the motor or the main control module.
Now, if you hear the motor whirring but the ejector arms don’t budge, you’ve likely got stripped gears inside the module. At that point, your best bet is to replace the whole ice maker assembly. Trying to fix tiny internal gears is more trouble than it’s worth. You can find quality replacement assemblies for your specific Whirlpool model from suppliers like RepairClinic.
For a broader look at fixing common refrigerator issues, our kitchen refrigerator fix guide is another great resource.
Finally, while you’re in there, give the ice mold itself a quick inspection. This is the tray where the water freezes into cubes. Look for any peeling or flaking on the non-stick coating. If that coating is damaged, cubes can stick tight, jamming the ejector arms and stopping the whole process.
Alright, so you’ve ruled out any mechanical jams or water supply problems. Now it’s time to dig into the electronic side of things. This part can feel a bit more intimidating, I get it. But more often than not, the culprit is one of a couple of key components. If you’re comfortable with some basic electrical checks, let’s pinpoint what’s going on.
First things first: unplug the refrigerator. Seriously. Safety is non-negotiable when you’re poking around wires and control boards.
The Overlooked Door Switch
You’d be surprised how often a faulty door switch is the reason an ice maker calls it quits. It’s a tiny, simple part with a big job: telling the refrigerator’s main control board if the door is open or shut.
If this switch fails and gets stuck telling the fridge the door is open, the ice maker won’t run. It’s a safety feature built into most Whirlpool models to prevent it from cycling and dumping ice while you have the door open.
Finding and testing it is easy. Look for a small plunger or lever-style switch along the door frame. With the door open, just press it in with your finger. Does the freezer light go out? If so, the switch is probably doing its job. If the light stays on, you’ve likely found your problem. A replacement is usually cheap and easy to find at places like Parts Select or Reliable Parts.
The Refrigerator’s Brain: The Control Board
So, what if everything else—the water valve, the mechanical arms, even that little door switch—seems perfectly fine? The last stop on our diagnostic tour is the main control board. Think of this as the central command center for the entire refrigerator. While it’s less common for these to fail, it does happen, and it can definitely be the root cause when nothing else adds up.
A failing control board might cause other strange issues with your fridge, not just the ice maker. But diagnosing it with 100% certainty is tricky without professional tools.
This is the point where you can waste a lot of money on a guess. A new control board isn’t cheap, and replacing one that isn’t actually broken is a frustrating and costly mistake. If you’ve worked through all the other steps and suspect an electronic issue, this is the perfect time to use our HomeWise Services’ $20 concierge service. One of our master technicians can help you diagnose the problem remotely, making sure you only spend money on the parts you actually need.
Deciding Between DIY and Professional Repair in Austin
So, you’ve checked the basics, maybe even thawed a frozen line, but the ice bucket is still stubbornly empty. This is where every Austin homeowner with a finicky Whirlpool ice maker hits a crossroads: do you keep digging into the DIY repair, or is it time to call in a pro for appliance repair in Austin?
Knowing your own limits is the most important part of this process. A well-intentioned fix can quickly spiral into a more complicated—and more expensive—headache. Simple tasks like swapping out a water filter or freeing up a jammed control arm are definitely in the wheelhouse for most folks. But the moment you start dealing with complex electronics or the sealed refrigerant system, it’s smart to pump the brakes.
When to Call a Professional
There are a few clear red flags that signal it’s time to put down the tools and pick up the phone. If you’ve run through all the common troubleshooting steps and are still coming up empty, the problem is likely deeper than a simple clog or a bad switch.
You should seriously consider calling for professional help if:
- You’re looking at a potential electrical problem with the main control board.
- The issue might involve the sealed refrigerant system (listen for hissing or look for an oily residue).
- You’ve already replaced a part, like the water inlet valve, and the problem is still there.
- The repair calls for using a multimeter, and you’re not completely comfortable with it.
Expert Insight: The biggest mistake we see homeowners in Austin make is guessing. Throwing money at a new control board or a whole ice maker assembly without a confident diagnosis is a surefire way to waste time and cash. A pro can pinpoint the exact failure, saving you from buying parts you don’t even need.
Understanding Repair Costs in Austin
Let’s be honest, the decision often comes down to money. The cost to fix an ice maker can swing wildly depending on what’s actually broken.
Based on recent data, a full Whirlpool ice maker assembly replacement, including parts and labor, typically runs between $260 and $450. On the other hand, simpler jobs like replacing a bad water inlet valve are much easier on the wallet, usually falling in the $75 to $150 range. For a more detailed breakdown, you can check out Angi’s repair cost guide.
This is where getting an expert opinion really pays off. A quick diagnostic call can tell you if you’re facing a minor tweak or a major replacement, letting you weigh your options without guessing. At HomeWise Services, we want to be your trusted local partner, helping you save money with honest, expert advice. For just $20, our concierge service connects you with a master technician for a clear diagnosis, so you don’t end up overspending on parts or repairs you didn’t need in the first place.
Your Whirlpool Ice Maker Questions Answered
https://www.youtube.com/embed/NND8J8dXqJ0
Even after running through all the troubleshooting steps, you might still have a few questions rolling around. That’s completely normal. Based on my years of experience, here are the answers to some of the most common things Austin homeowners ask us when their Whirlpool refrigerator just won’t make ice.
How Long Should It Take for My Whirlpool Refrigerator to Make Ice After a Reset?
Patience is key here. After you’ve reset the ice maker or fixed whatever was causing the problem, you need to give it some time. Realistically, it can take anywhere from 4 to 24 hours before you see that first satisfying batch of ice drop.
The appliance needs to get back down to its ideal temperature (a chilly 0°F), fill the mold, and then run a full freezing cycle. A single cycle usually takes about 90 minutes to two hours if everything is working perfectly. If you’ve waited a full 24 hours and your ice bin is still empty, that’s a pretty clear signal to go back through the troubleshooting steps or get an expert opinion.
Can a Clogged Water Filter Really Stop the Ice Maker Completely?
Absolutely, and it happens all the time. A clogged water filter is one of the top culprits I see when a Whirlpool ice maker stops working. Its job is to catch impurities from your water supply, but eventually, it gets saturated and chokes off the water flow.
If the ice maker can’t get enough water during its fill cycle, it will either stop producing ice entirely or just spit out small, hollow, or misshapen cubes. My rule of thumb, especially for homes in Austin with our hard water, is to change the filter every six months like clockwork.
Is It Worth Repairing an Old Whirlpool Ice Maker?
This is the big question, and the answer really comes down to a bit of math. If your refrigerator is less than 8-10 years old and the fix is something straightforward and under $400—like swapping out the ice maker assembly itself—then repairing it is almost always the smarter financial move.
However, if your fridge is getting up there in age and showing other signs of wear, or if the problem is deep in the sealed system (like a coolant leak), the repair costs can skyrocket. At that point, you’re better off putting that money toward a new appliance.
Why Is My Ice Maker Making a Loud Buzzing Noise But No Ice?
A loud, angry buzzing sound almost always points to one of two things: a problem with the water inlet valve or a mechanical jam. The buzzing could be the sound of the valve straining to open but failing, either because the valve itself is bad or the line is blocked. It could also be the motor trying to cycle but getting stopped by a stuck ice cube.
First Action: The moment you hear that sound, turn the ice maker off. You don’t want to burn out the motor. Then, take a look and see if you can spot an ice cube jamming the ejector arm or in the mold. If you don’t see anything obvious, the water inlet valve is your most likely suspect.
I get it—ice maker problems are incredibly frustrating. In fact, they’re one of the most common appliance failures out there. Statistics show that issues with ice makers are a major headache, affecting roughly 50% of refrigerators bought since 2014, making them a top complaint alongside cooling failures.
For more in-depth repair guides and home maintenance tips, you can also check out additional stories from our experts.
Now, let’s tackle a few more common questions we hear from homeowners.
Frequently Asked Questions
| Question | Answer |
|---|---|
| Why did my ice maker stop working after a power outage? | A sudden power outage can sometimes scramble the ice maker’s internal electronics. The first step is always to perform a hard reset by unplugging the refrigerator for 5-10 minutes. If that doesn’t work, the control board may have been damaged by a power surge. For $20, our concierge service can help diagnose this. |
| Can I fix my Whirlpool ice maker myself? | Many common issues like a stuck control arm or a clogged water line are great DIY fixes. For more complex electrical or mechanical problems, it’s often best to get expert help. You can start with our $20 concierge service for a professional diagnosis before deciding. |
| What does the red light on my ice maker mean? | A solid or blinking red light usually indicates an error. On many Whirlpool models, it means the sensor arm (or “bail arm”) is blocked or in the “off” position, telling the unit the ice bin is full. Check that the arm can move freely and isn’t stuck. |
| Is it safe to use my refrigerator if the ice maker is broken? | Yes, it’s perfectly safe. A broken ice maker will not affect the cooling performance of the refrigerator or freezer compartments. You can simply turn the ice maker off and continue to use the rest of the appliance as normal. |
Hopefully, these answers clear up any lingering confusion. Fixing an appliance can feel daunting, but breaking it down one step at a time makes it manageable. For just $20, you can skip the stress and connect with a HomeWise master technician to troubleshoot your appliance, get part recommendations, and schedule a white-glove repair in Austin, TX. Book now: [LEAD FORM LINK HERE]. Want instant advice? Try JustAnswer for fast, reliable help.
Article created using Outrank

Leave a comment