An air gap plumbing diagram is just a simple drawing that shows you how this clever little safety device keeps gross, contaminated drain water from ever backing up into your clean water supply. Is water suddenly leaking from that chrome thing on your sink? You're not alone. As Scott MasterTch on JustAnswer, where I've answered over 1,500 questions, and as the founder of HomeWise Services in Austin, I help homeowners solve these exact problems daily. An air gap plumbing diagram is the first step to understanding the issue.
For immediate, one-on-one help, you can chat with me directly. Try JustAnswer for $5, but be sure to cancel within 7 days via "My Account" > "Membership" > "Cancel membership" or contact [email protected] to avoid monthly fees. For Austin locals who prefer hands-on help, my HomeWise $20 concierge service provides expert diagnostics and white-glove repair scheduling. Need a pro? Book a white-glove repair right here.
What an Air Gap Plumbing Diagram Shows You
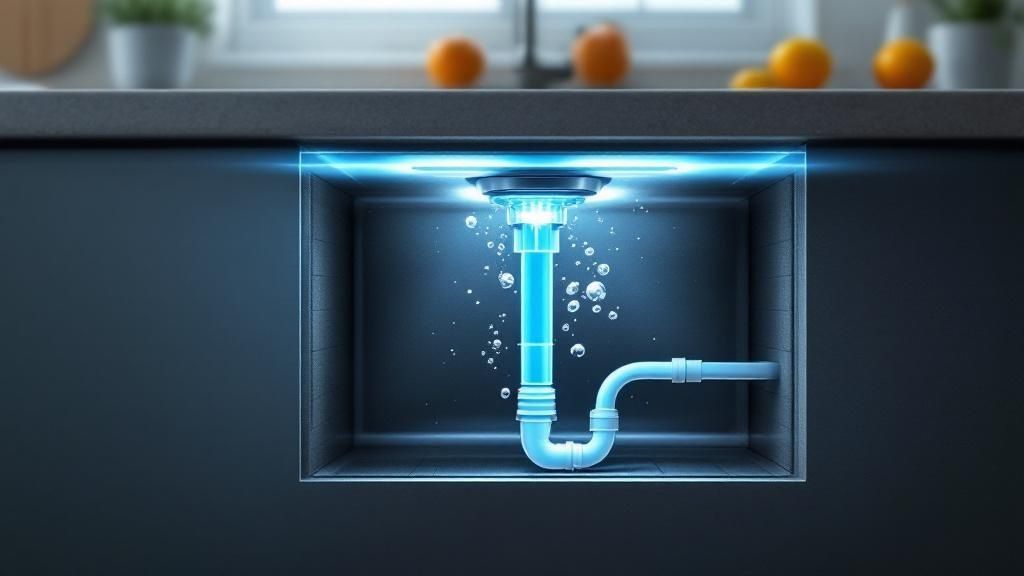
When you look at one of these diagrams, you'll see a few key players that work together to keep your home's water safe: the inlet hose coming from your appliance, the outlet hose heading to the drain, and the physical air gap device that sits between them. Getting a handle on this basic layout is always the first step if you're trying to figure out common problems, like why water is suddenly leaking from that chrome thing on your countertop.
This is fundamental knowledge you need before you even think about trying a DIY fix or picking up the phone to call a plumber. The whole idea of an air gap has been a non-negotiable part of plumbing codes for decades, requiring a clear, open vertical space to stop any chance of backflow contamination. That space is almost always at least one inch, a standard that has massively improved the safety of our drinking water. (If you're a history buff, you can explore the history of plumbing research at NIST). As an expert who's personally answered over 1,500 plumbing questions on JustAnswer, I can tell you that a quick grasp of this system helps homeowners in Austin solve these issues way more efficiently.
Now, let's break down the individual parts you'll see in a typical diagram so you know exactly what you're looking at.
Key Components in an Air Gap Diagram
This table provides a quick rundown of the essential parts shown in a standard air gap plumbing diagram and what they do.
| Component Name | Function and Importance | Common Location |
|---|---|---|
| Air Gap Fitting | The physical device, usually chrome, that mounts on the sink or countertop. It provides the vertical space to prevent backflow. | Mounted on the sink deck or countertop, typically near the main faucet. |
| Appliance Inlet Hose | Brings dirty discharge water from the appliance (like a dishwasher) up to one side of the air gap fitting. | Connects the appliance's drain outlet to the smaller nipple on the air gap fitting. |
| Drain Outlet Hose | Carries the water from the other side of the air gap fitting down into the garbage disposal or sink drain. | Connects the larger nipple on the air gap fitting to the garbage disposal or a Y-branch tailpiece. |
| Physical Air Gap | This isn't a part you can buy, but the crucial open space inside the fitting where water falls from the inlet to the outlet side. | Inside the main body of the air gap fitting, above the countertop level. |
Understanding these four core components is the key to both installing an air gap correctly and troubleshooting any leaks or blockages you might encounter down the road.
Why an Air Gap Is Critical for Your Home
It’s easy to overlook that little chrome cap on your countertop, but a plumbing air gap is much more than a simple code requirement—it's one of the most important safeguards for your family's health. This simple device creates a physical break to prevent backflow, a nasty situation where dirty water from your sink drain gets sucked back into your dishwasher.
Without an air gap, there's a real risk of contaminated wastewater mixing with the clean water used to wash your dishes. This can happen more often than you'd think. In a place like Austin, where hard water can clog pipes and sudden shifts in city water pressure can create back-siphonage, a functional air gap is an absolute must-have. On JustAnswer, I recently helped an Austin homeowner diagnose a clogged drain line causing this exact issue—we had it sorted out in minutes.
This isn't a new idea, either. The principle of physically separating clean and dirty water was a game-changer in modern sanitation, helping to stop the spread of waterborne illnesses like cholera. You can learn about the history of water supply and sanitation to see just how foundational these systems are. If you ever suspect a problem with yours, getting familiar with your plumbing repair options in Austin, TX is the right move to keep your home and family safe.
Common Types of Air Gap Systems
Walk into any modern Austin home, and you're likely to find an air gap system, but they aren't all one-and-the-same. The two you’ll see most often are for dishwashers and water softeners. Each setup is a bit different, so knowing which one you have is the first step to understanding how it works and what to do if it acts up.

Dishwasher Air Gaps
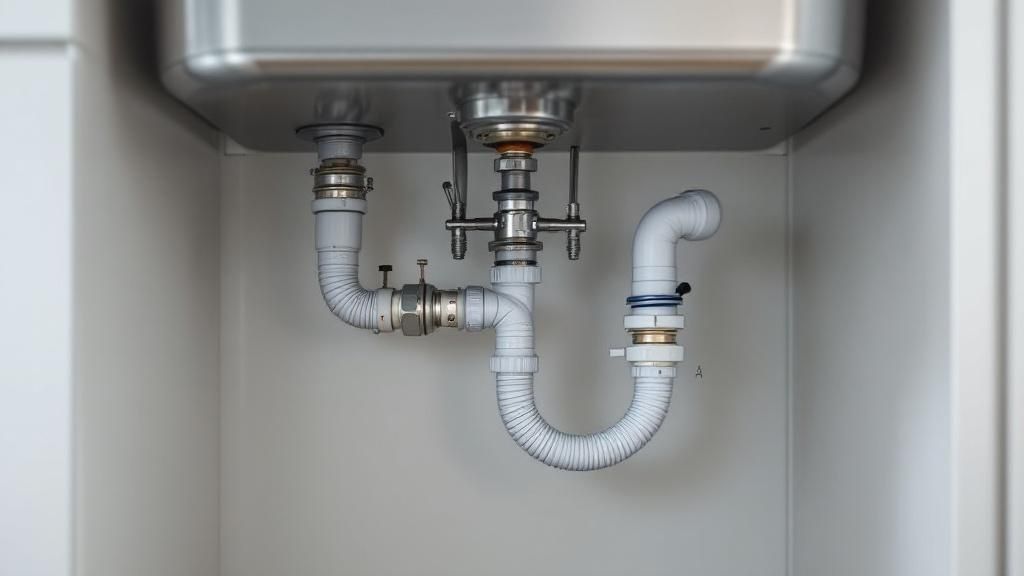
This is, by far, the most common type you'll run into in Austin kitchens. The air gap plumbing diagram for a dishwasher is pretty straightforward. You'll see a drain hose coming from the dishwasher, looping up to that little chrome device on your countertop, and then heading back down to connect into your garbage disposal or sink drain.
This simple loop is what prevents dirty sink water from ever siphoning back into your clean dishwasher.
Water Softener Air Gaps
With water softeners, the setup is a bit different but the principle is the same. The diagram for these shows the softener's drain line emptying into a utility sink or a dedicated standpipe. The key is that the end of the drain hose must be at least one inch above the flood level of the sink or pipe, creating that critical physical gap.
If you’ve done some troubleshooting and realized you need a new dishwasher air gap, you can usually find high-quality replacements at a place like RepairClinic. If you need help identifying the exact part number, I can assist you through my HomeWise concierge service or a quick chat on JustAnswer.
How to Read an Air Gap Plumbing Diagram
Looking at an air gap plumbing diagram for the first time might seem a little intimidating, but it’s actually more straightforward than you’d think. Essentially, it’s a simple map that uses basic symbols and lines to show you exactly how wastewater gets from your dishwasher to your drain without any risk of backflow.
You'll notice two main lines in any schematic. The first is the inlet hose, which is the smaller of the two. This line carries discharge water from the appliance up to the air gap fitting itself. The second is the larger outlet hose, which lets that same water flow from the air gap down into your garbage disposal or sink drain connection.
Decoding Key Air Gap Specifications
This diagram breaks down the common measurements you'll find in a standard residential air gap setup. It highlights the crucial details like the inlet and outlet diameters and the necessary vertical space between them.
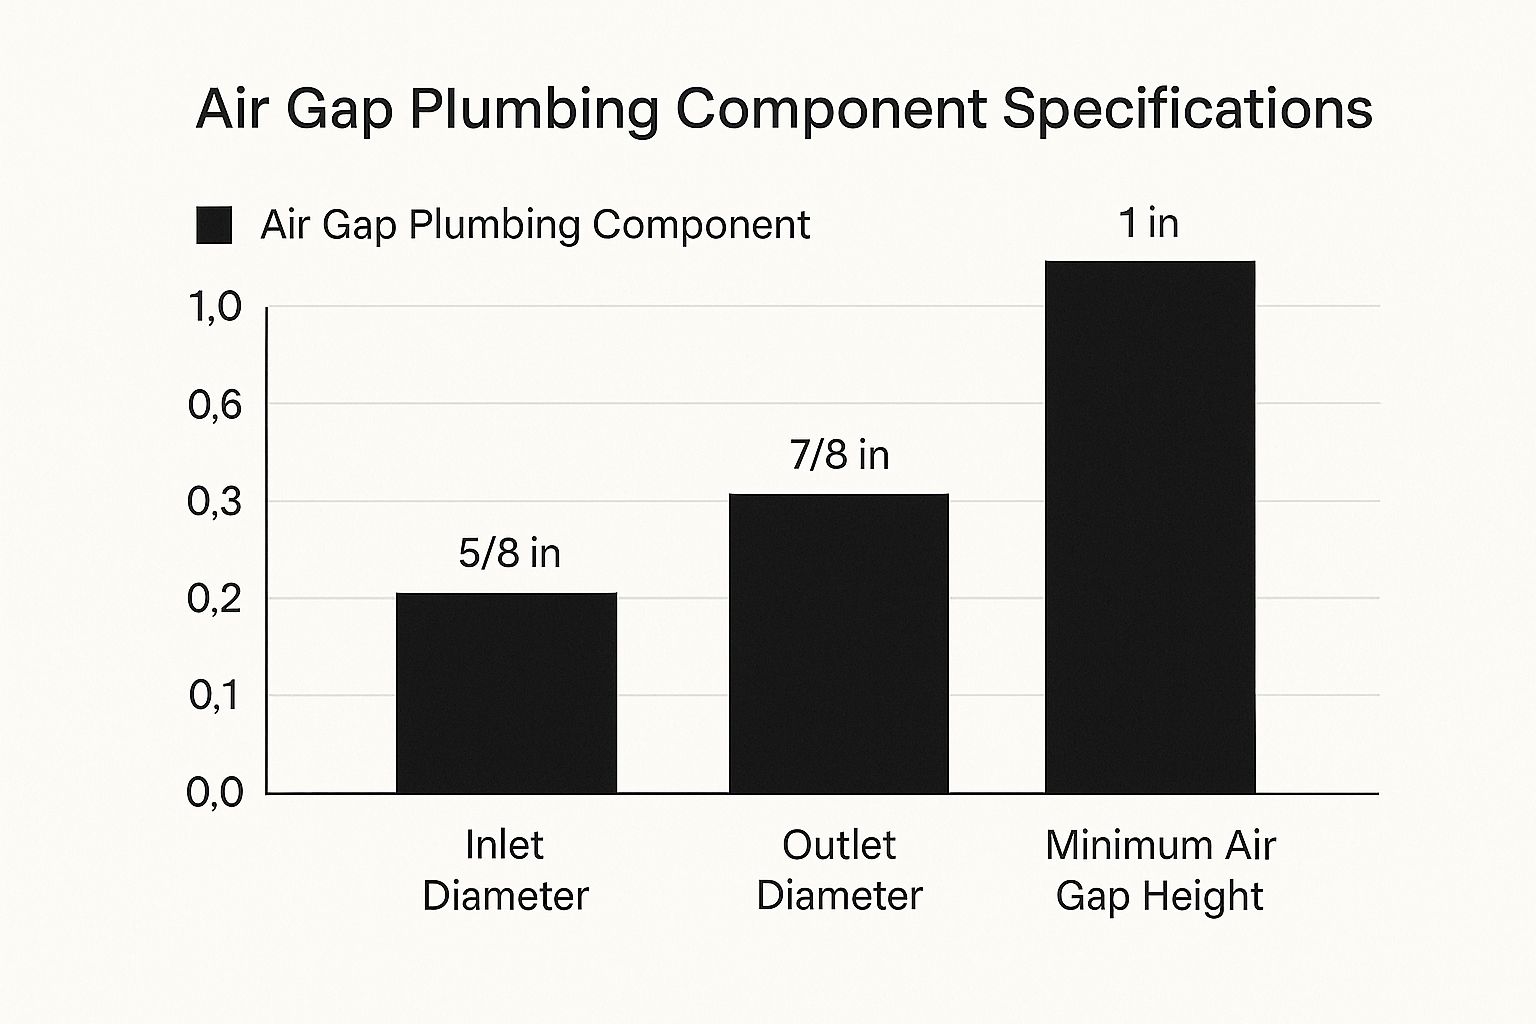
If there's one thing to take away from this, it's that the outlet hose is always wider than the inlet hose. This design is critical—it ensures wastewater can drain away faster than it comes in, which is what prevents messy backups onto your countertop.
Struggling to make sense of your own setup, especially with issues like buildup from Austin's hard water? The HomeWise $20 concierge service is a great resource for getting quick, professional advice. I'll personally troubleshoot with you over the phone, recommend the right parts from trusted suppliers like Sears PartsDirect or Parts Select, and schedule a white-glove repair if needed. You can book a consultation right here to connect with me.
Air Gap Diagram Symbol Legend
To get comfortable reading these schematics, it helps to know what the common lines and symbols mean. This table is a quick-reference guide to help you decode any air gap plumbing diagram you come across.
| Symbol or Line | What It Represents | What to Check For |
|---|---|---|
| Solid Line (Thin) | Inlet Hose (from Dishwasher) | Kinks, clogs, or loose connections. Ensure it's the correct 5/8" diameter. |
| Solid Line (Thick) | Outlet Hose (to Disposal/Drain) | Blockages, sagging, or improper connections. Must be the wider 7/8" diameter. |
| Rectangular Box | The Air Gap Body/Fitting | Cracks, leaks, or internal debris. This is the central component mounted on the sink or countertop. |
| Arrows | Direction of Water Flow | Confirms water is moving from the inlet, through the air gap, and out to the drain. |
| Dotted Line | Physical Countertop or Sink Surface | Shows the mounting point and ensures the air gap is properly elevated above the flood level rim. |
| Circle/Oval | Connection Point | Look for secure clamps and ensure there are no leaks where hoses connect to the air gap or disposal. |
Using this legend, you can quickly identify each part of the system and troubleshoot potential problems, like figuring out whether a leak is coming from the inlet connection or the air gap body itself.
Troubleshooting Common Air Gap Problems
So, you've got a grasp of the air gap plumbing diagram, and now it's time to put that knowledge to work. If you suddenly see water sputtering out of the little vents on your countertop air gap, don't panic. It's not a sign the device itself is broken—quite the opposite. It’s actually doing its job perfectly by alerting you to a problem somewhere downstream.
The number one culprit, almost every time, is a clog in the outlet hose running from the air gap to your garbage disposal. It's a prime spot for food debris, grease, and even mineral buildup from Austin's notoriously hard water to create a nasty blockage. When that happens, the draining dishwasher water has nowhere to go but up and out through the air gap's vents.
How to Fix a Leaking Air Gap
Here are the steps to clear that blockage and get things flowing smoothly again:
- Start by pulling the decorative cap off the air gap body on your sink.
- Peer inside the fitting and clean out any gunk or debris you can see right away.
- Next, disconnect the outlet hose (it's the larger of the two) from the side of the garbage disposal.
- Use a small, flexible brush or even just a strong blast of water to flush out whatever is clogging up the hose. Need a new drain hose? You can find a universal one at Parts Select.
If a simple cleaning doesn't solve the leak, you might be dealing with a more stubborn clog or another issue. These persistent problems sometimes need a professional touch, which we discuss in our full guide to appliance repair in Austin, TX.
When to Call in a Professional Plumber
Look, I'm a big fan of DIY, and many air gap problems are straightforward enough for a homeowner to tackle. But knowing when to put the tools down and pick up the phone is just as important. If you’ve cleaned out the lines and the leak just won't quit, or if you start noticing issues with your main drain line, that's your cue to call for backup.
Trying to muscle through a complex plumbing repair can easily turn a small headache into a major catastrophe, not to mention potential code violations. It’s a risk that’s just not worth taking, especially in your Austin home.
How I Can Help
For Austin-area residents, this is where my $20 concierge service through HomeWise Services can be a real lifesaver. I can help diagnose the problem remotely and, if it's something that needs hands-on work, I'll connect you with a trusted, high-quality repair service to handle it. This takes the guesswork out of finding a reliable pro and ensures the job is done right. A portion of all HomeWise proceeds goes to support the Texas Amputee Golf and Wellness Foundation (@TAGWFSA).
Proper plumbing isn't just a convenience; it's a critical safety standard. It's surprising, but millions of American homes still lack complete plumbing facilities. If you're interested in the bigger picture, you can read the full US Water Alliance report on water access to see why these standards matter so much.
- If you're really stuck on a diagnosis and need immediate guidance, you can also get instant help from me on JustAnswer.
- It's worth noting that complex diagnostics aren't just for plumbing. Your home's cooling system can be just as tricky, which is why we've also put together a guide on AC repair in Austin, TX.
We Get These Questions A Lot
When it comes to something as specific as an air gap, it’s natural to have questions. Here are some of the most common things we hear from homeowners in Austin.
Is an Air Gap Actually Required for My Dishwasher in Austin?
Yes, it is. For any new dishwasher installation, the plumbing codes here in Austin and across Texas require a physical air gap. This is all about preventing backflow and keeping the public water supply safe and clean.
You might see older homes with a simple 'high loop' drain hose instead, but a true air gap is the current standard for passing inspection and ensuring safety.
Why Is Water Suddenly Leaking from the Air Gap on My Sink?
If you see water spitting out of the little vents on your air gap, the most likely culprit is a clog. The drain hose that runs from the air gap down to your garbage disposal is probably blocked.
This is a really common issue, especially with Austin's hard water. Food scraps, grease, and mineral scale can build up and create a blockage, forcing the dishwasher water up and out of the air gap. For instant help diagnosing this, chat with me on JustAnswer. For local Austin help, book my $20 concierge service.
Can I Handle an Air Gap Installation or Replacement Myself?
If you're just swapping out an old air gap for a new one, and you're pretty comfortable with basic plumbing, it's a project you can likely handle. However, putting one in from scratch is a bit more involved. It often means drilling a new hole in your countertop and getting all the connections just right to be watertight and up to code.
Expert Tip: If you're on the fence about doing it yourself, our $20 HomeWise concierge service is a great resource. We can give you step-by-step advice over the phone or just schedule a licensed plumber to make sure the job is done perfectly.
How do I avoid JustAnswer's monthly fees?
To get fast, expert advice without the commitment, you can sign up for the $5 trial. Just be sure to cancel your membership within 7 days to avoid recurring monthly charges. You can cancel easily through your account settings ('My Account' > 'Membership' > 'Cancel membership') or by emailing their support at [email protected]

Leave a comment