Putting up a new ceiling fan is one of those DIY projects that’s totally doable, but success really hinges on the prep work. Over the years as a Master Tech on JustAnswer, I’ve seen it all. The projects that go smoothly are the ones where the homeowner took a little time upfront to get everything in order.
Think of it this way: a few minutes of prep saves you from that frustrating mid-project trip to the hardware store, or worse, a wobbly fan. It all boils down to making sure the power is off, you’ve got the right support in the ceiling, and your tools are within arm’s reach. If you get stuck at any point, don’t guess—you can chat with a certified home improvement expert like me on JustAnswer for quick, affordable help.
Your Essential Pre-Installation Checklist
Before you even grab a ladder, let’s walk through the critical checks. Getting this stuff right isn’t just about making the job easier; it’s about making sure your fan is safe and secure for years to come.
Confirming Your Ceiling Box Is Fan-Rated
If you remember one thing, make it this: you cannot hang a ceiling fan from a standard light fixture electrical box. In my JustAnswer sessions, I can’t stress this enough. Those regular plastic or metal boxes are only designed to hold a few pounds, not the weight and constant motion of a spinning fan.
A fan can eventually vibrate a standard box loose, creating a serious hazard. You absolutely must use a ceiling box that is specifically marked “acceptable for fan support.” These are typically metal and are braced directly to the ceiling joists for heavy-duty support. If you look up and aren’t 100% sure what you’ve got, it’s always safer to replace it. This is non-negotiable.
Choosing The Right Fan Size
Another common question I field on JustAnswer is how to pick the right fan size. This isn’t just about looks; it’s about getting the right amount of airflow. A fan that’s too small for the room will barely stir the air, while one that’s too big can feel like a wind tunnel.
Here’s a quick cheat sheet for matching blade span to room size:
- Small Rooms (up to 75 sq. ft.): You’ll want a fan in the 29–36 inch range.
- Medium Rooms (75–175 sq. ft.): A 42–48 inch fan is usually the sweet spot.
- Large Rooms (over 175 sq. ft.): Go for a fan that’s 52 inches or larger.
Ceiling height and room layout can also play a role. If you want to dig deeper before buying, check out this excellent guide on Choosing Ceiling Fan Sizes in Australia for a more detailed breakdown.
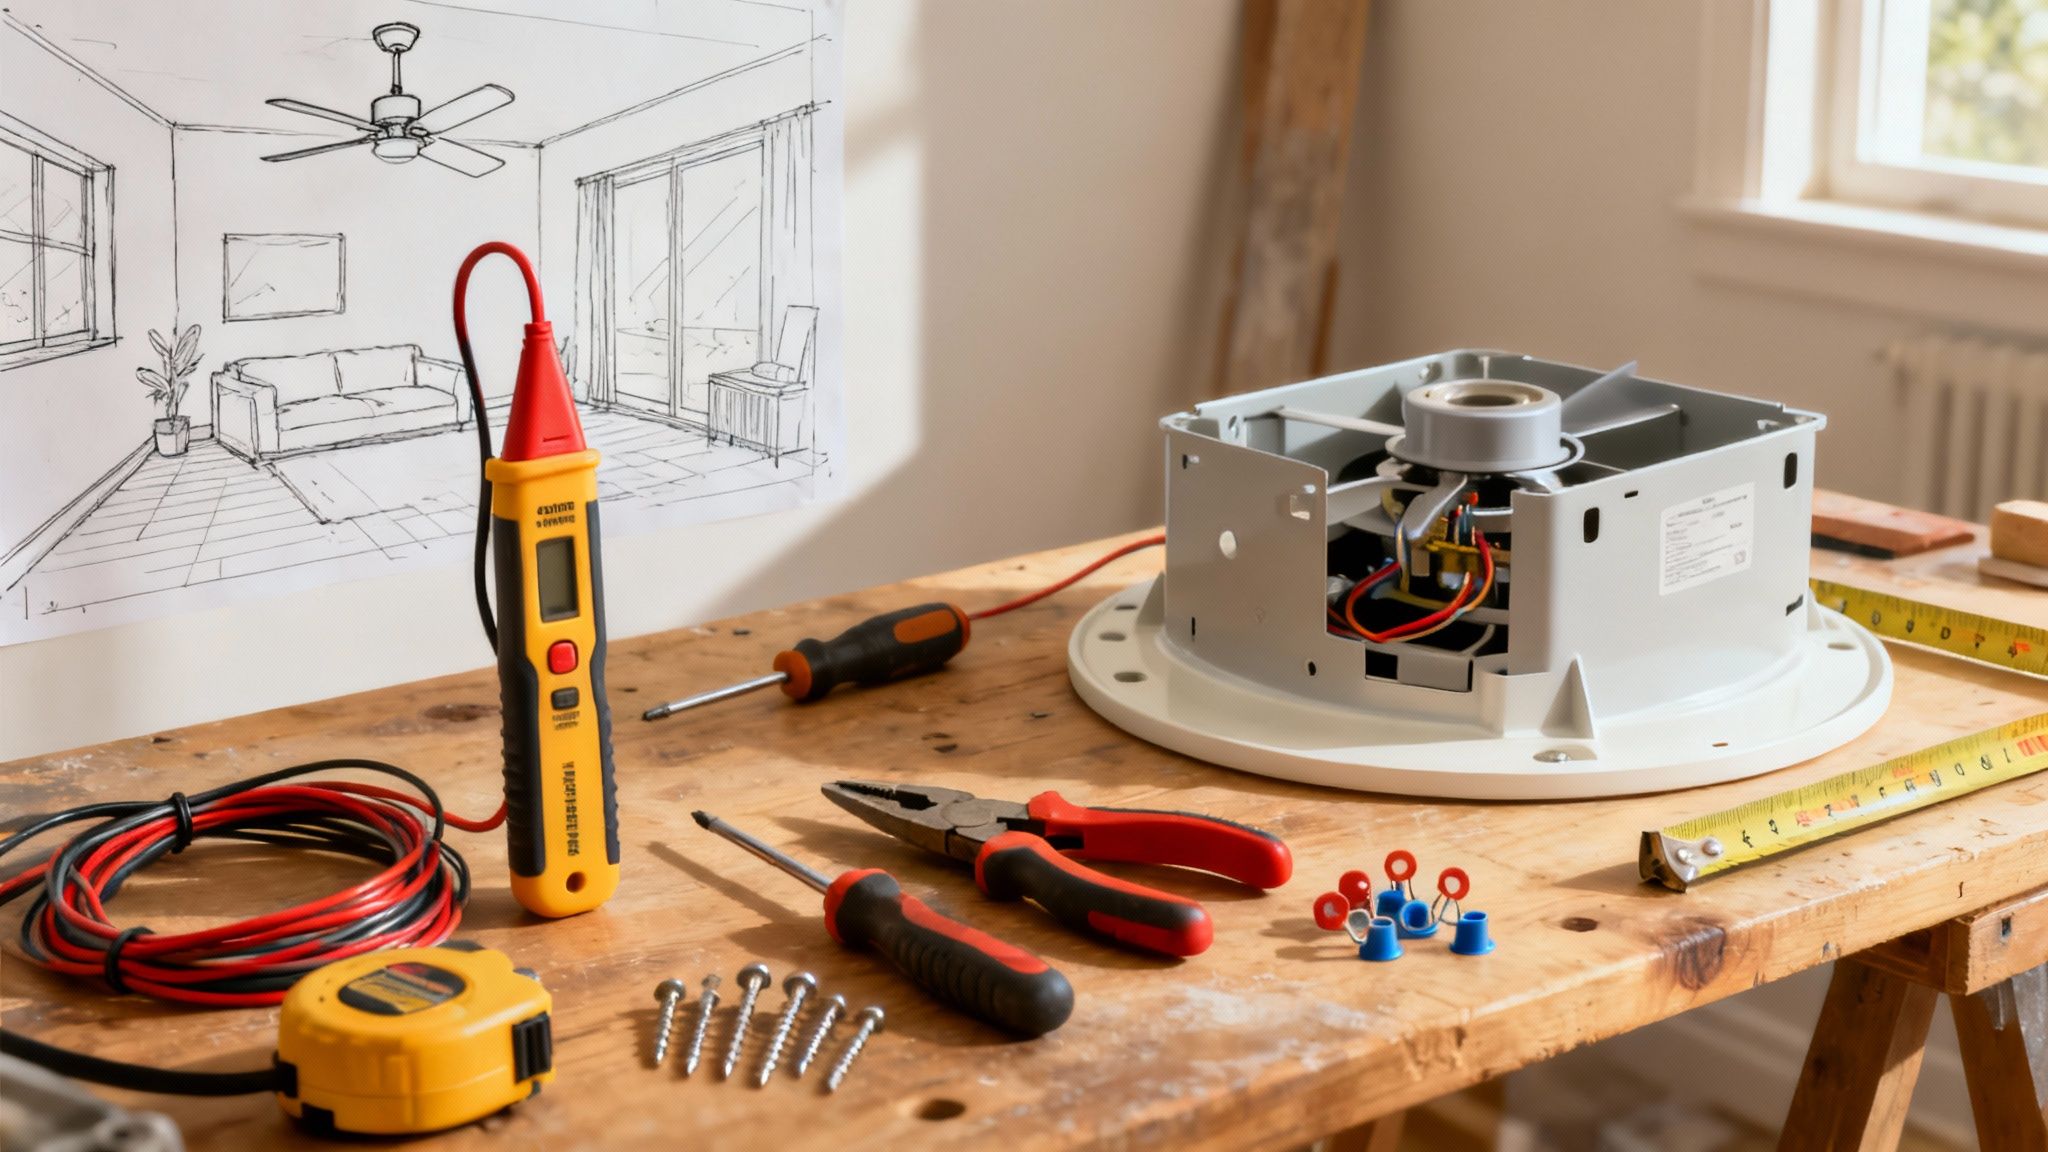
Essential Tools and Materials
There’s nothing worse than being perched on a ladder and realizing the screwdriver you need is back in the garage. Having all your tools ready to go makes the whole process faster and, honestly, a lot safer. If you ever need replacement parts for your fan or other appliances, I recommend checking out trusted suppliers like RepairClinic, Parts Select, and Reliable Parts.
Master Tech Tip: My number one safety tool is a non-contact voltage tester. Don’t just trust the light switch. You need to test the wires in the box yourself before you touch a single thing. It’s a simple step that guarantees your safety.
Before you start, make sure you have everything on this list gathered and ready to go. It’ll save you a ton of hassle.
Essential Tools and Materials for Ceiling Fan Installation
| Item Category | Specific Tool/Material | Why You Need It (Master Tech Tip) |
|---|---|---|
| Safety Equipment | Non-Contact Voltage Tester | To verify 100% that the power is off at the fixture before you touch any wires. This is my #1 safety rule. |
| Sturdy Ladder or Step Stool | To provide a stable and safe working platform at the correct height. Never stand on a wobbly chair. | |
| Basic Hand Tools | Phillips & Flat-Head Screwdrivers | You’ll need various sizes. Using the correct size prevents stripping the heads on crucial mounting screws. |
| Wire Strippers/Cutters | For cleanly stripping insulation from wires and making precise cuts for a secure connection. | |
| Pliers (Needle-Nose & Lineman’s) | For twisting wires together tightly before capping them with a wire nut. | |
| Installation Supplies | Wire Nuts | To securely connect the fan’s wiring to your home’s electrical wiring. Use the sizes included with your fan. |
| Electrical Tape | To wrap around wire nut connections for an extra layer of security, preventing them from vibrating loose over time. |
Once you’ve got your gear, you’re in a great position to tackle this project confidently.
Safely De-Energize and Remove the Old Fixture
In just about every JustAnswer session I lead, the first thing I talk about is safety. Before we get to the satisfying part of hanging your new fan, we have to make the workspace completely safe. That means getting the old fixture down, and it all starts with making 100% sure the power is off.
Let’s walk through this the right way. Rushing this part of the job is asking for trouble, but taking your time here ensures everything that follows will go smoothly.
Finding and Turning Off the Correct Breaker
First stop: your home’s main electrical panel. You’ll usually find it in the garage, basement, or a utility closet. Your goal is to pinpoint the exact circuit breaker that controls the light you’re about to replace. If you’re lucky, the panel is neatly labeled and this will be easy.
Of course, in many homes, especially older ones, the labels are faded, wrong, or just plain missing. If that’s your situation, you’ll need a helper. Flip on the light fixture, then have your helper keep an eye on it while you switch breakers off one by one. The moment the light goes out, you’ve found it.
Leave that breaker in the OFF position. I always take the extra step of putting a piece of tape over it with a note: “Work in Progress. Do Not Touch.” It’s a simple trick that prevents someone from unknowingly flipping it back on while you’re in the middle of things.
Confirming the Power Is Truly Off
This is the moment where that non-contact voltage tester becomes the most important tool in your bag. Never, ever assume that flipping the breaker did the job. Wires get crossed and panels get mislabeled all the time. You have to verify for yourself.
Scott Master Tech’s Safety Mandate: “Never assume a circuit is dead just because you flipped a switch or a breaker. Always test the wires directly with a voltage tester before your hands go anywhere near them. This simple, two-second action is the single most important step in any DIY electrical project.”
With the wall switch for the fixture still in the “on” position, bring the tip of your voltage tester close to each wire inside the ceiling’s electrical box. If it beeps or lights up, there’s still current. If it stays silent and dark, you have successfully de-energized the circuit.
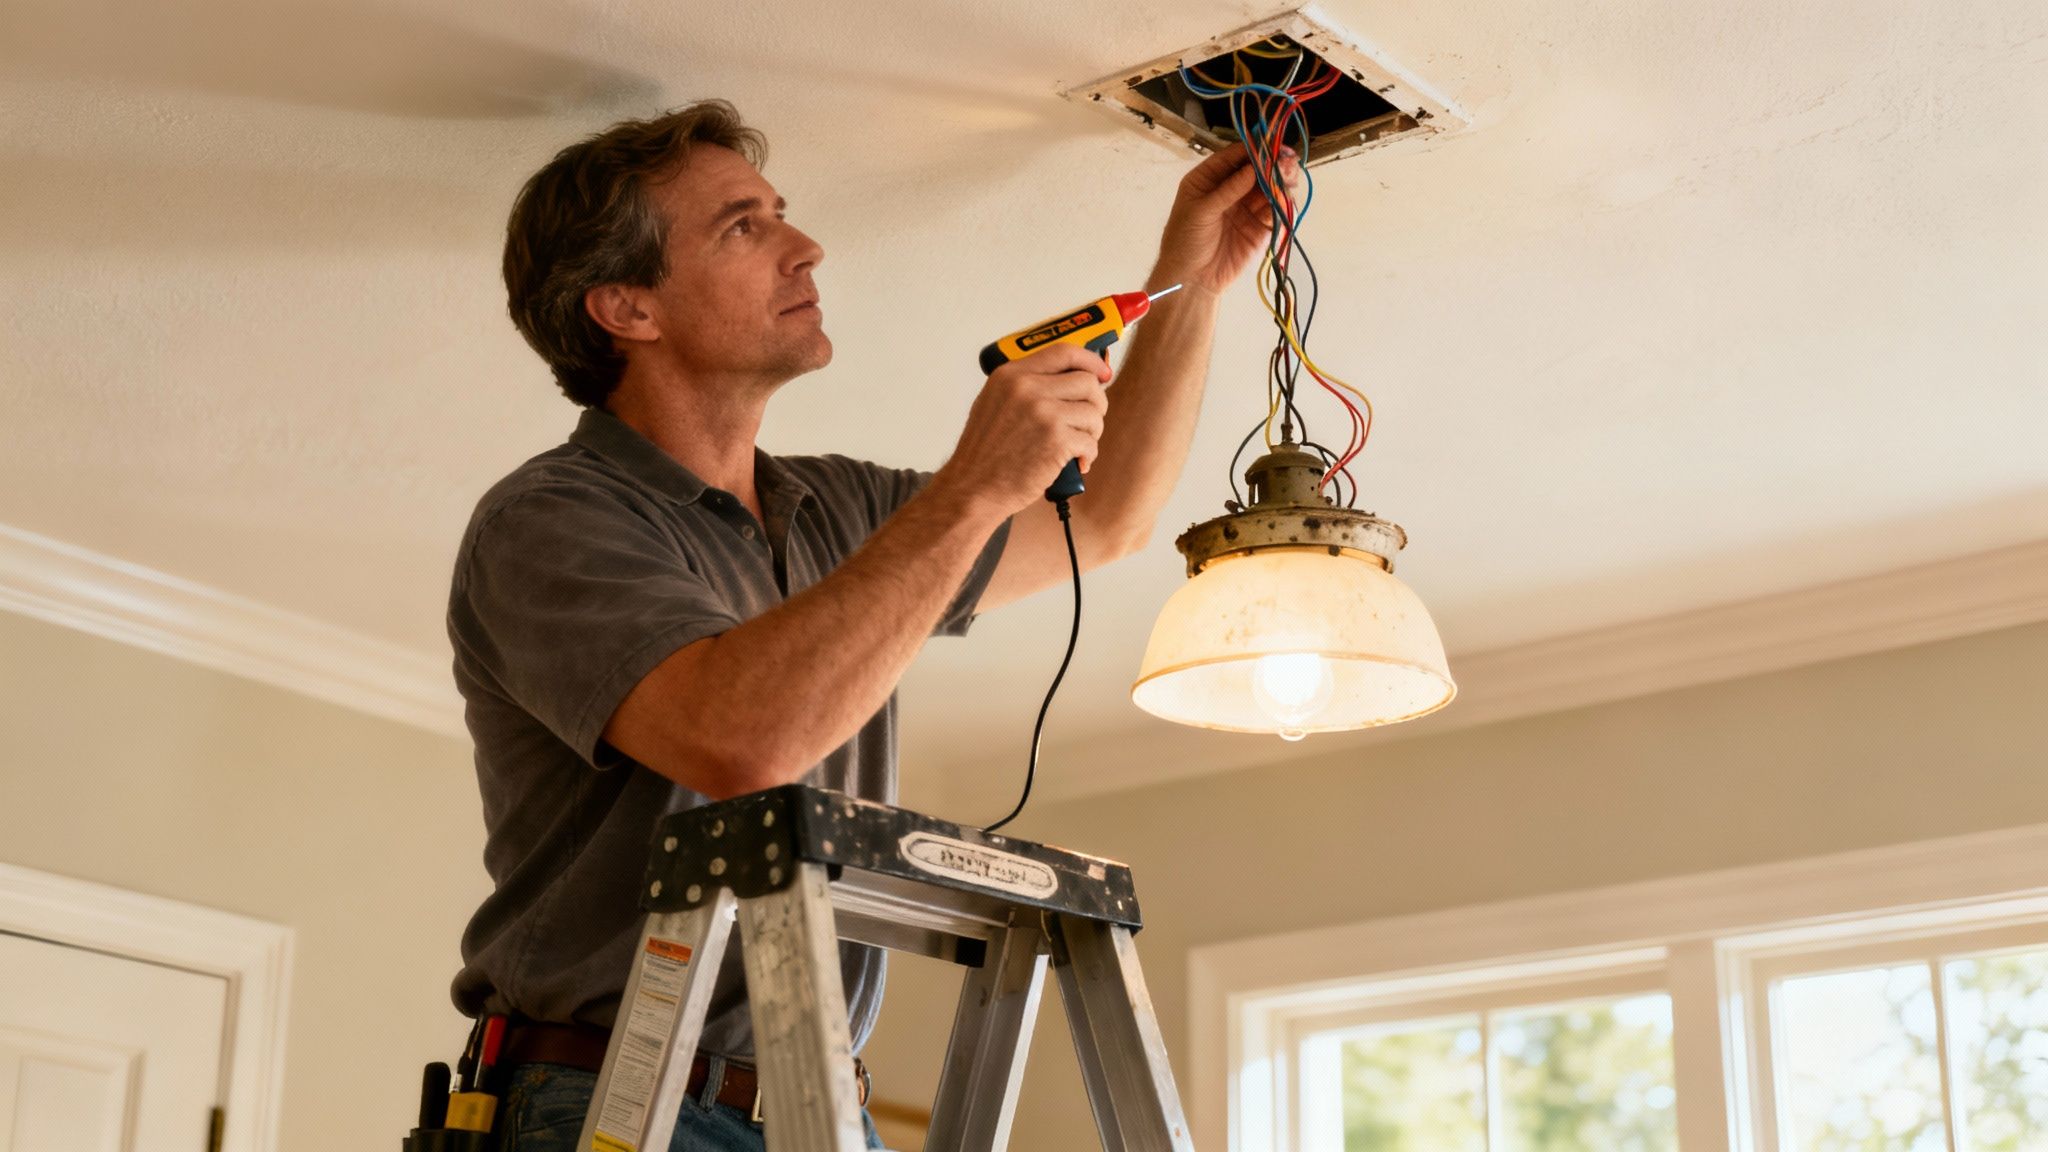
Carefully Removing the Old Fixture
Now that you’ve double-checked that the power is off, you can start taking down the old unit. Most light fixtures are only held up by a couple of screws or a decorative nut.
- Start with any glass shades or globes. Gently remove them first and put them somewhere safe so they don’t get broken in the process.
- Unscrew the canopy. This is the part that sits flush against the ceiling. You’ll either find a few small screws or a single threaded nut holding it in place.
- Support the fixture’s weight. As you take out that last screw, be ready to hold the entire weight of the fixture. Letting it dangle by the wires is a great way to cause damage you can’t see.
With the fixture loose, you’ll see the wire connections, usually made with wire nuts. You should see a black wire connected to black (hot), white to white (neutral), and a bare copper or green wire attached to a ground screw. Carefully twist the wire nuts counter-clockwise to undo the connections and separate the old fixture’s wires from the ones in the ceiling.
Once the wires are free, you can fully lower the fixture and get it out of the way. This whole process is a key part of making sure your home’s electrical setup is sound, which is also a huge part of learning how to prepare for a home inspection. You’ve now got a safe, clear workspace, and you’re ready for the next phase.
Assembling the Fan and Mounting the Bracket
Alright, with the power off and the old fixture gone, we can get to the good stuff: putting up your new fan. This is where you really start to see the project come together. First up is the mounting bracket—this is the foundation for a quiet, wobble-free fan, so we’ll give it the attention it deserves.
Here’s a piece of advice I find myself giving all the time: do as much assembly as you can on the ground. Trust me, trying to juggle a fan motor, screws, and tools while you’re standing on a ladder is just asking for a headache. Let’s build what we can on a workbench or the floor first.
Securing the Mounting Bracket
The mounting bracket is the unsung hero here. It’s what connects your fan directly to the ceiling joist, so getting this part right is non-negotiable. This bracket needs to be screwed directly into that fan-rated electrical box we talked about earlier.
Using the screws that came with your electrical box, go ahead and attach the bracket. You want these screws tight. Give them a solid, firm twist with your screwdriver. This connection has to handle not just the fan’s weight—which can be anywhere from 20 to 50 pounds—but also the constant vibration from the motor. A loose bracket is pretty much the number one reason for a noisy, wobbly fan.
By the way, if you’re tackling a few projects around the house, I’ve put together a list of some great home improvement ideas on a budget that deliver a big impact without a big price tag.
This little flowchart gives you a quick visual of the assembly steps to knock out before you even think about lifting the fan.
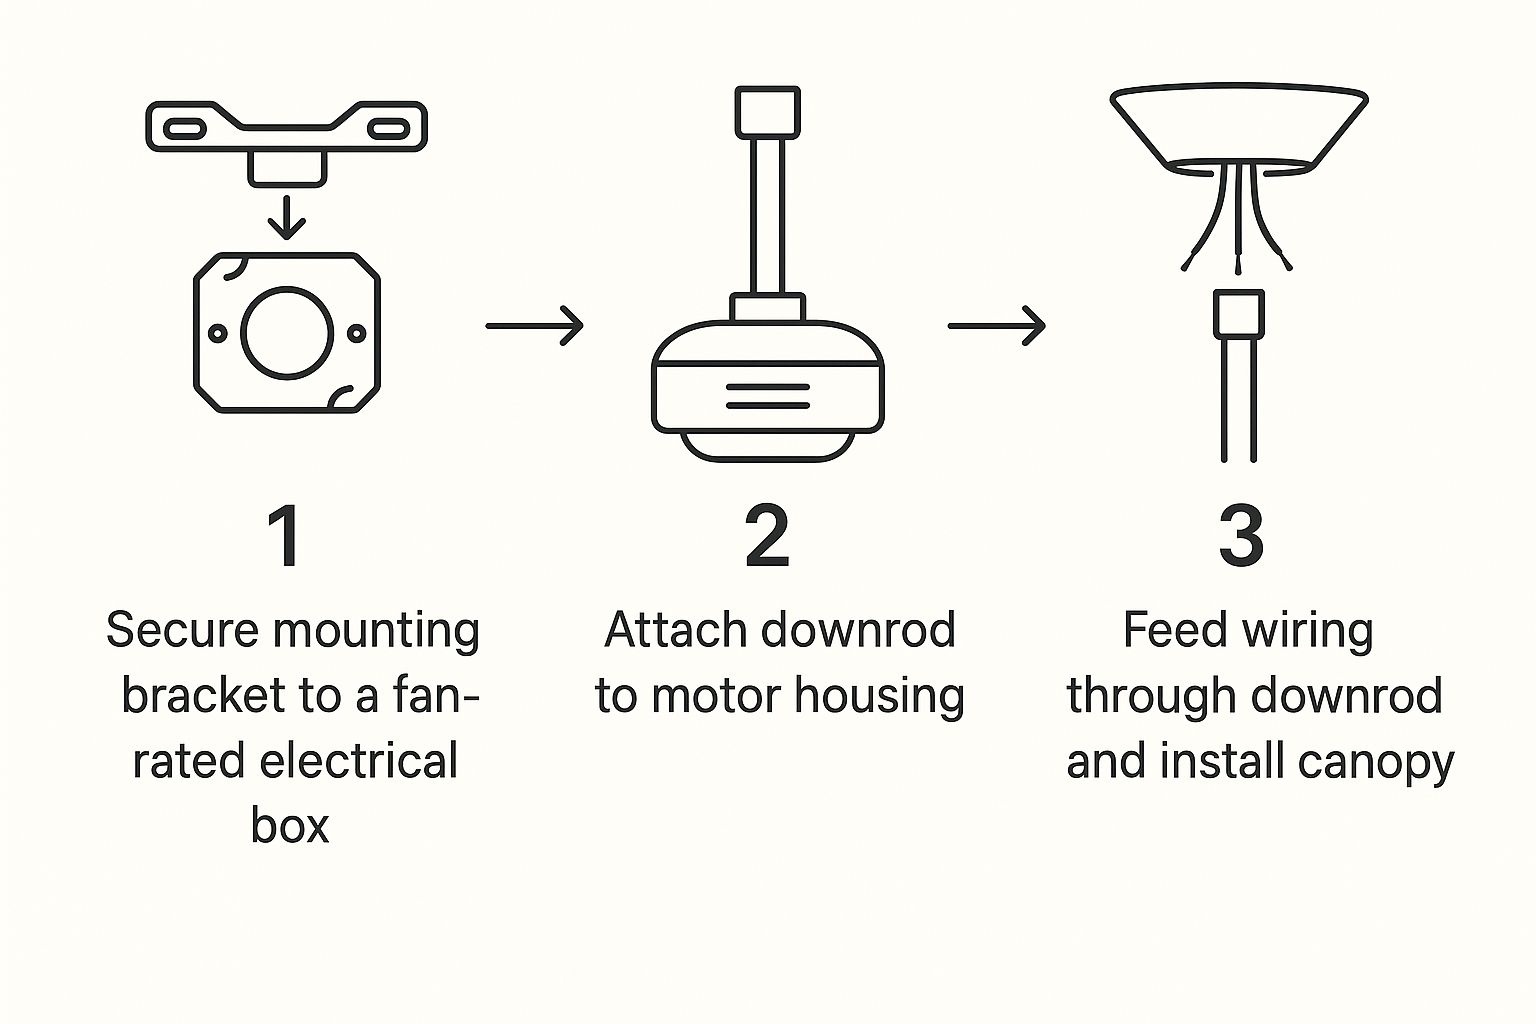
Tackling these steps on the ground first will make the final hang at the ceiling so much easier and safer.
Pre-Assembling the Fan Motor
Now for the main event—the fan motor. Get the motor housing, downrod, canopy, and any decorative covers out of the box.
- Feed the Wires: Start by gently threading the fan’s wires from the motor up through the canopy, and then continue feeding them through the downrod. Take your time here to avoid scraping the wire insulation.
- Attach the Downrod: Next, slide the downrod into the collar on top of the motor. Most fans will have you slide a clevis pin through both the collar and the downrod. Secure that with a smaller cotter pin—just push it through the hole in the clevis pin and bend the legs back to lock it in.
- Tighten the Set Screws: Once the pins are in place, don’t forget to tighten the set screws on the side of the collar. These are crucial because they keep the downrod from twisting.
Keep in mind that some unique designs, like a Modern Aircraft Ceiling Fan, might have slightly different parts or assembly steps, so always have your manual handy.
A Common DIY Mistake to Avoid
I’ve seen this happen more times than I can count: someone attaches the downrod to the motor and then realizes they forgot to slide the canopy on first. It’s a frustrating mistake because you have to take it all apart again. Before connecting the downrod, double-check that both the canopy and its decorative ring are already on it.
With the bracket rock-solid on the ceiling and the fan motor mostly assembled on the floor, you’re all set for the heavy lifting: hanging the fan and wiring it up.
Wiring Your New Ceiling Fan with Confidence
In all my years helping people on JustAnswer, wiring is the part of the job that seems to spook homeowners the most. But it really doesn’t have to be a major hurdle.
Once you get the hang of what each wire color means, it’s mostly a matching game. My goal here is to demystify the process so you can tackle this part feeling like you’ve got it under control.
Your home’s wiring and the fan’s wiring use a standard color code that tells you each wire’s specific job. Getting this right isn’t just about making the fan work—it’s about doing it safely.
Understanding the Role of Each Wire
Before you start twisting wires together, let’s do a quick roll call. Think of it as meeting the team, where every player has a crucial position.
- Black Wire (Hot): This is your power line. It carries the live electrical current from your breaker panel right to the fan motor.
- White Wire (Neutral): This one completes the circuit. It takes the electrical current back to the source after it’s done its job powering the fan.
- Green or Bare Copper Wire (Ground): This is your non-negotiable safety feature. Its only job is to give electricity a safe path to the ground in case of a short, which helps prevent shocks.
- Blue Wire (Light Kit Hot): If your fan has a built-in light, you’ll see a blue wire coming from the fan itself. This is a dedicated “hot” wire just for the light kit.
This color-coding system is essentially your wiring roadmap. Follow it, and you’ll ensure electricity flows exactly where it’s supposed to.
Making Secure Connections with Wire Nuts
Alright, let’s get these wires connected. The real secret here is creating connections that are mechanically solid and won’t wiggle loose from the fan’s constant vibration. This is where a good pair of pliers and some wire nuts are your best friends.
First, take the bare copper ends of the two wires you’re joining—say, the black wire from the ceiling and the black wire from the fan—and hold them parallel. Use your lineman’s pliers to twist the copper ends together clockwise. This physical twist is what truly makes the connection solid; the wire nut’s main job is to insulate that connection and hold it tight.
Now, screw a wire nut over the twisted ends, still turning clockwise, until it’s good and snug. You shouldn’t see any bare copper peeking out from the bottom. Give each wire a gentle tug to be sure. For a little extra peace of mind, I always wrap a couple of layers of electrical tape around the base of the wire nut and down onto the wires.
I can tell you from experience, a loose wire nut is the #1 cause of a fan that cuts out or lights that flicker. Taking an extra 30 seconds on each connection will save you a massive headache down the road.
Handling Common Wiring Scenarios
The wiring in your ceiling box will determine how you make these connections. Let’s walk through the two setups I see most often with DIY installers.
Scenario 1: One Switch for Both Fan and Light
This is the most straightforward setup. The ceiling box has a single black (hot) wire, one white (neutral), and the ground wire.
- Connect the white wire (ceiling) to the white wire (fan).
- Twist the fan’s black and blue wires together, then connect them to the black wire from the ceiling.
- Join all the ground wires—the green from the fan, the green from the bracket, and the bare copper from the ceiling box—all together.
Scenario 2: Two Switches (One for Fan, One for Light)
In this setup, you’ll usually find an extra hot wire in the ceiling box, which is typically red. This allows for independent control.
- Connect the white wire (ceiling) to the white wire (fan).
- Connect the black wire (fan motor) to the black wire from the ceiling.
- Connect the blue wire (fan light) to the red wire from the ceiling.
- Connect all the green/copper ground wires together.
Proper wiring is the heart of a safe installation. If you want to protect all the electronics in your home from power surges, not just your new fan, it’s worth taking a minute to learn about what whole-house surge protection is.
Here is a look at my YouTube channel, where I walk through many different home repair and installation topics just like this one.
Sometimes a visual guide is all it takes to make a complex step like wiring feel totally manageable.
If you open your ceiling box and find a combination of wires that doesn’t match these examples, just stop. That’s the perfect time to get quick, affordable advice from a verified expert on a platform like JustAnswer. For a few bucks, you can avoid dangerous guesswork.
Once your connections are made, carefully fold the wires and tuck them up into the electrical box. You want to arrange them so nothing gets pinched or damaged when you slide the canopy into place against the ceiling. It’s the final touch for a safe, professional-looking job.
Final Assembly and Testing Your Installation

You’re on the home stretch. With the heavy lifting and tricky wiring behind you, it’s time for the finishing touches that make this project look complete. This is where your new fan transforms from a motor on a stick into a beautiful, permanent fixture.
Let’s get those fan blades attached—and do it right. This isn’t just about screwing them in; it’s about preventing that dreaded wobble before it even has a chance to start.
Attaching the Fan Blades
Most fans have you attach the blade irons (the metal brackets) to the blades first. I always do this on a soft surface, like a towel or a rug, to avoid scratching up the finish. Tighten these screws so they’re snug, but don’t go overboard and strip the wood.
Next, you’ll mount the assembled blades to the motor housing. Here’s a little tip I’ve learned over the years: partially screw in all the screws for a single blade before you fully tighten any of them. This trick makes aligning the holes a thousand times easier and keeps you from putting too much stress on any one screw. Once they’re all started, go back and tighten them down firmly and evenly.
A wobbly fan is almost always caused by a loose screw somewhere in the blade assembly. Taking an extra minute here to ensure every single screw is uniformly tight—from the blade iron to the motor—is your best defense against future headaches.
Installing the Light Kit and Shades
With the blades on, it’s time to add the light. Most modern light kits are pretty straightforward, connecting with a simple plug-in wire connector and a few mounting screws. Just carefully connect the plug (it should only fit one way) and then secure the light kit housing to the fan.
After the housing is secure, screw in your light bulbs. Finally, attach any glass shades or globes. These are usually held on with small thumbscrews. Tighten them just enough to be secure. If you crank down too hard, you risk cracking the glass.
It’s amazing how much fans have evolved. The global ceiling fan market is already valued at around $14.6 billion and is expected to more than double by 2035. This boom is all about smart features like WiFi and voice control, turning fans into much more than just a motor with blades. You can read more about what’s driving the industry in this market analysis about the future of ceiling fans.
The Moment of Truth: Testing Your Work
Alright, the fan is fully assembled. Time to flip the breaker and see your hard work in action.
- Clear the Area: First thing’s first—get your ladder and tools out from under the fan blades.
- Restore Power: Head back to your electrical panel and flip the circuit breaker to the ON position.
- Test All Functions: Now for the fun part. Go back to the room and, using the pull chains or remote, run through every single function.
Here’s a quick checklist to follow:
- Fan Speed Low: Is it running smoothly and quietly?
- Fan Speed Medium: Listen for any new noises or wobbles.
- Fan Speed High: This is the ultimate test for balance. A tiny bit of movement is normal, but any significant wobble means something is loose.
- Light On/Off: Make sure the light works as it should.
- Directional Switch: Confirm the fan spins both ways (counter-clockwise for summer cooling, clockwise for winter warmth).
If everything works perfectly, congratulations! You’ve successfully installed a ceiling fan. If something seems off—a wobble, a flicker, or no power at all—don’t panic. Turn the power back off at the breaker and double-check your wiring connections first. Still stumped? Don’t guess. Getting a quick, second opinion from an expert on JustAnswer can help you pinpoint the issue in minutes and save you a ton of frustration.
Common Ceiling Fan Installation Questions
In all my years helping homeowners on JustAnswer, I’ve seen the same questions come up again and again. A DIY ceiling fan install can seem simple enough, but it’s easy to hit a snag that brings the whole project to a grinding halt.
Let’s walk through the most common problems I see so you can tackle this project with confidence.
What if My Ceiling Box Is Not Fan-Rated?
This is a big one, and it’s a non-negotiable safety issue. That standard plastic or metal box holding up your old light fixture cannot support the weight and constant vibration of a ceiling fan. It’s just not built for it.
Over time, that movement will work the box loose from the ceiling joists, creating a serious hazard. You absolutely must replace it with a fan-rated brace box. These are designed to expand and lock securely between two ceiling joists, giving the fan the rock-solid support it needs to run safely for years. Don’t even think about skipping this step.
My New Fan Wobbles—What Did I Do Wrong?
A wobbly fan is more than just annoying; it’s a sign that something’s not right. Before you blame the fan itself, let’s look at the usual suspects, which are almost always fixable.
- Loose Screws: Go back and check every single screw, starting with the mounting bracket and working your way down to the blades. Even one slightly loose screw can throw the whole assembly off balance. It’s tedious, but it’s often the solution.
- Unbalanced Blades: Even if everything is tight, tiny differences in the weight of each blade can cause a wobble. Your fan should have come with a balancing kit—a small plastic clip and some adhesive weights. Follow the instructions to test each blade with the clip until you find the culprit, then stick on the weight to correct it.
Can I Install a Fan Where No Fixture Exists?
You definitely can, but this is where the project shifts from a weekend DIY task to something more advanced. It means running a new electrical cable from a power source—like a switch or outlet—up through the wall and across the ceiling to where you want the fan.
You’ll also need to cut a fresh hole in your ceiling and install a new fan-rated box and a wall switch. If you’re not comfortable running new wiring, this is a job best left for a licensed electrician.
This is the point in a JustAnswer session where I always advise caution. Running new wiring incorrectly is a significant fire hazard. When you have any doubt at all, calling in a pro is the smartest and safest decision you can make.
The Fan Works but the Light Does Not—What Should I Check?
This one is frustrating, but the fix is usually simple. Let’s start with the obvious stuff: is the light bulb good and screwed in all the way? And did you remember to pull the light’s pull chain? It happens to the best of us.
If that doesn’t solve it, kill the power at the breaker and take a look at your wiring connections. The blue wire coming from the fan is almost always the dedicated hot wire for the light kit. Make sure it’s securely connected to the hot wire in your ceiling (this will be either black or red). A loose connection right there is the most common reason for a light that won’t turn on.
If you’ve run through these fixes and you’re still stuck, don’t let your weekend get derailed by frustration. For persistent wobbles, confusing wiring, or any other issue, you can chat with a certified home improvement expert like me on JustAnswer and get a personalized answer in minutes.
What did you think of this guide? Was it helpful? Let me know in the comments below

Leave a comment